
3D exterior rendering for single-family homes is the process of generating photorealistic, computer-generated imagery (CGI) of a residential property’s exterior before or during construction, using architectural CAD data, material specifications, and site context to produce client-ready visuals. For single-family home builders, this means converting blueprints, elevation drawings, and finish schedules into high-resolution renders that accurately communicate massing, materiality, fenestration, landscape integration, and lighting conditions across multiple design phases. Delivered as still images, 360-degree panoramas, or animated walkthroughs, these renders are actively used in pre-sale campaigns, permit submissions, municipality approvals, investor presentations, and buyer customization workflows.
Single-family home builders who adopt architectural visualization early in their pipeline consistently report shorter sales cycles, fewer design revision requests mid-build, and stronger buyer confidence at the point of contract signing. Whether you are building five homes per year or fifty, understanding exactly how the rendering process works, what assets you need to supply, and how to interpret deliverables will save your team significant time and money.
If you are evaluating a studio partner to produce these visuals, The 3D Exterior Rendering Company’s premium residential and commercial 3D exterior rendering services offer a proven, 10-plus-year workflow specifically calibrated for residential builders across single-family, multi-family, and mixed-use project types.
Why Single-Family Home Builders Are Prioritizing 3D Exterior Visualization
The single-family residential sector is not immune to the pressures reshaping the broader construction and development industry. Rising material costs, compressed timelines, and increasingly discerning buyers have made traditional 2D floor plan marketing insufficient.
Here is what is driving rapid adoption of 3D exterior rendering among single-family builders specifically:
- Pre-sales velocity: Photorealistic renders allow builders to sell lots before a single foundation is poured, generating deposits and de-risking speculative inventory.
- Buyer personalization at scale: Renders can be rapidly iterated to show different facade finishes, roof colors, garage door styles, and landscaping scenarios, giving buyers a sense of ownership without costly physical samples.
- Municipal and HOA approvals: Many jurisdictions and homeowner associations now expect rendered elevation visuals as part of design review submissions.
- Competitive differentiation: In a crowded market, a builder’s website or listing with a photorealistic render consistently outperforms competitors still relying on hand-drawn elevations or generic stock photography.
- Reduced RFIs during construction: When tradespeople and subcontractors can reference a detailed visual model, the volume of requests for information (RFIs) related to exterior details drops measurably.
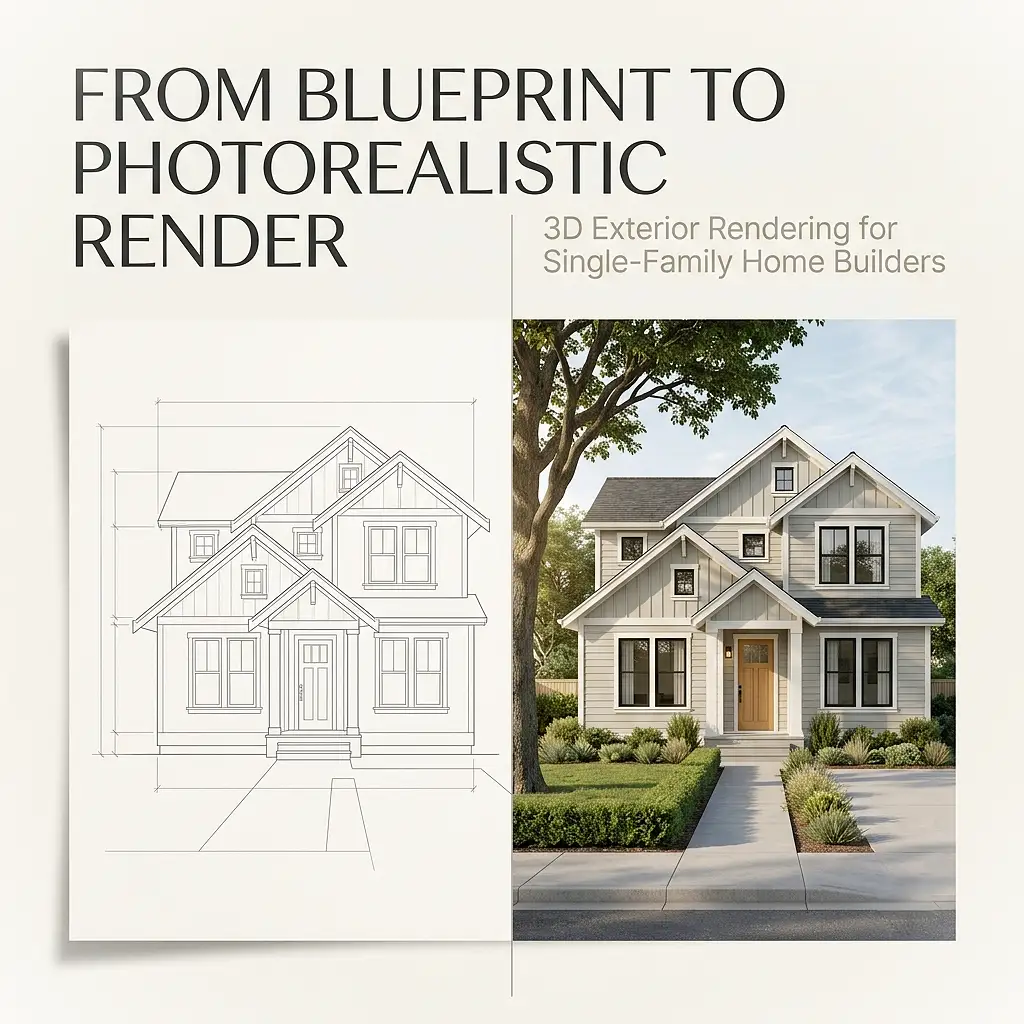
According to the National Association of Home Builders (NAHB), marketing quality is among the top factors that influence a buyer’s builder selection, particularly in the move-up and luxury segments. Visual content is now a core part of that marketing equation, not an optional add-on.
What 3D Exterior Rendering for Single-Family Homes Actually Involves
Understanding the scope of a rendering project helps builders set realistic expectations, communicate effectively with studio partners, and prepare the right deliverables upfront.
The Core Deliverable Types
A full-service studio will typically offer one or more of the following for single-family residential projects:
| Deliverable Type | Description | Best Used For |
|---|---|---|
| Still Exterior Render | Single photorealistic image of the home’s exterior | MLS listings, print brochures, permit submissions |
| Hero Elevation Render | Front-facing wide-angle view with full landscaping | Website hero images, hoarding boards |
| Multiple Angle Package | 3-4 views (front, rear, side, aerial) | Buyer packages, HOA submissions |
| 360-Degree Panorama | Interactive, navigable view of the property | Website embeds, interactive presentations |
| Dusk/Twilight Render | Evening lighting with interior light glow | Premium listings, social media, luxury marketing |
| Animated Exterior Walkthrough | 30-90 second fly-around or drive-up video | Digital ads, project launch videos |
For most single-family home builders working at volume, a still image package covering three to four angles per elevation type delivers the strongest return on investment.
What the Rendering Studio Produces
A professional 3D exterior rendering studio will:
- Build a detailed 3D model of the home’s exterior using your architectural drawings as the primary reference.
- Apply photorealistic materials including brick, cladding, trim, roofing, glazing, and hardware finishes.
- Construct a site environment with driveways, walkways, lawns, trees, shrubs, and neighboring context where required.
- Light the scene using physically based rendering (PBR) engines such as V-Ray, Corona Renderer, or Unreal Engine, simulating real-world solar angles and atmospheric conditions.
- Compose the final frame with camera angle, lens selection, and depth-of-field settings that mirror professional architectural photography.
- Post-produce the image in Adobe Photoshop to refine sky replacement, color grading, and foreground entourage (people, cars, plantings).
The output is a final high-resolution JPEG or PNG file, typically delivered at 4K resolution (3840 x 2160 pixels) or higher for print-ready work.
The Full Workflow: From Brief to Final Delivery
Understanding the rendering workflow in sequence allows builders to plan project timelines accurately and avoid the most common bottleneck: delayed asset submission.
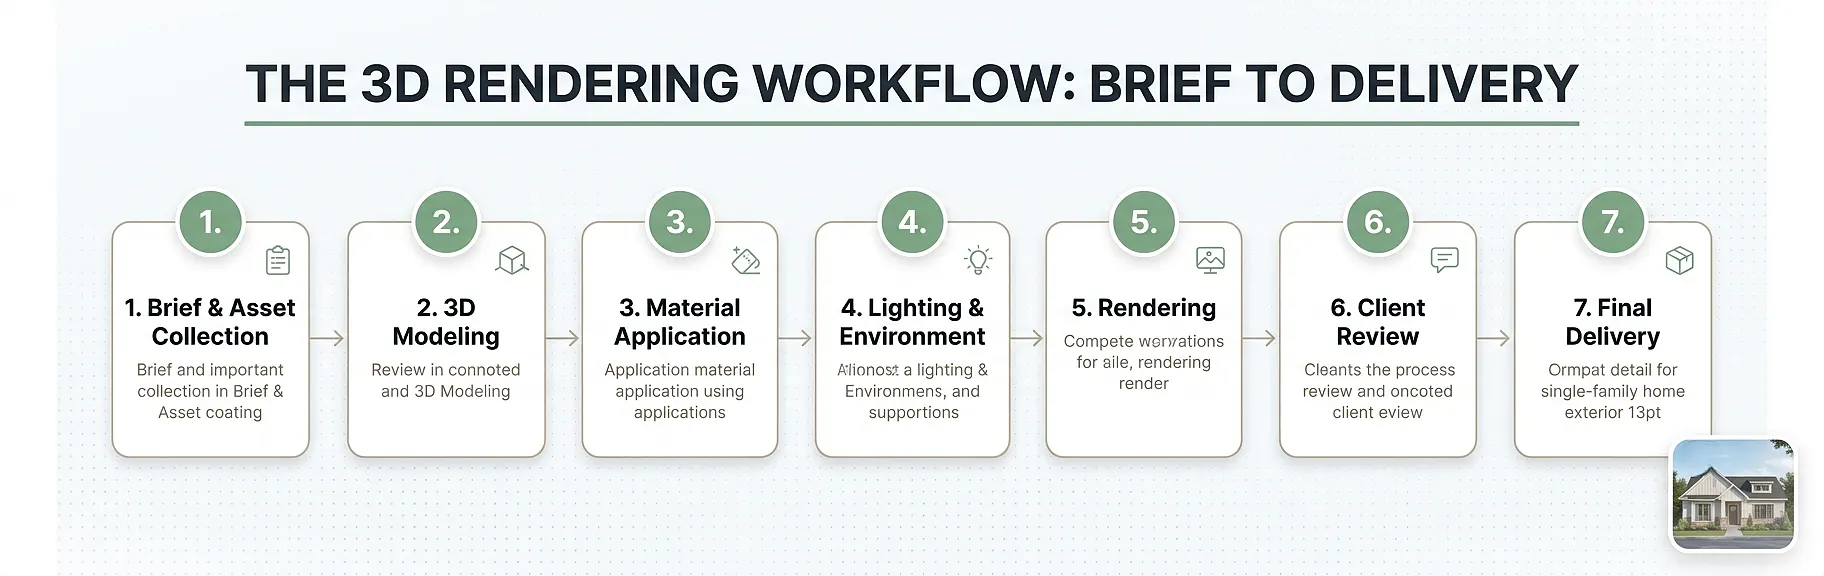
For a detailed breakdown of each production phase, the 3D exterior rendering workflow guide walks through every step from initial brief to final file delivery, including what happens inside each production stage.
Step 1: Project Brief and Asset Collection
The studio begins by gathering all project inputs. For a single-family home, this typically means:
- Architectural drawings: Floor plans, elevations (all four sides), roof plan, and cross-sections in PDF, DWG, or DXF format.
- Material specifications: A finishes schedule identifying siding type, cladding color, roofing material, window frame color, entry door style, and any feature elements like stone veneer or decorative trim.
- Site plan: Showing the home’s position on the lot, driveway layout, and any grade changes.
- Reference images: Mood board or inspiration images showing the desired visual style, lighting feel, and landscape character.
- Rendering brief: Camera angles requested, time of day, season, and any specific marketing intent (e.g., “this render will be used as a website hero image at 1920×1080”).
The more complete this submission package, the faster and more accurately the studio can move.
Step 2: 3D Modeling
The studio’s modeler constructs the exterior shell of the home in 3D software, typically Autodesk 3ds Max, SketchUp Pro, or ArchiCAD, cross-referencing all four elevation drawings simultaneously. Accuracy at this stage is critical: window positions, roofline profiles, fascia depths, and material transitions must match the construction drawings precisely.
For standard single-family home designs, modeling typically takes two to four business days depending on architectural complexity.
Step 3: Material Application and Texturing
Once the 3D model is complete, the team applies high-resolution material textures. This is where the render begins to look like a real home rather than a grey box. Key material tasks include:
- Sourcing or creating accurate texture maps for specified siding, brick, or stone profiles.
- Matching paint colors to manufacturer references (Sherwin-Williams, Benjamin Moore, or PPG color codes).
- Applying realistic glazing reflections to windows and doors.
- Detailing metalwork including gutters, downpipes, flashings, and hardware.
Step 4: Lighting and Environment Setup
The scene is lit using physically accurate sun and sky simulations. The studio will set the solar angle based on the geographic location of the project and the desired time of day. This matters because northern-hemisphere and southern-hemisphere projects receive light from opposite directions; an incorrect solar angle can make a render look geographically implausible.
Surrounding environment assets, including trees, turf, hedges, parked vehicles, and neighboring structures, are positioned at this stage.
Step 5: Rendering and Post-Production
The scene is rendered at high resolution using a render farm or dedicated workstation. Post-production in Photoshop refines the final image: sky replacement, color temperature adjustments, depth enhancement, and entourage population (people, pets, bicycles) are added to bring the scene to life.
Step 6: Client Review and Revision
The studio delivers a first-draft render, typically as a lower-resolution “preview” image, for client review. Builders should use this stage to check:
- Material accuracy against specified finishes.
- Architectural correctness (window placement, roof pitch, proportions).
- Camera angle and framing.
- Landscaping and site context.
Most professional studios include one to two rounds of revisions in their base quote. Additional revisions are billed separately, so thorough first-draft feedback is important.
Step 7: Final Delivery
Approved renders are delivered as high-resolution files in the agreed format. Standard delivery includes a full-resolution JPEG for digital use and a layered PSD file for print adaptation.
What to Prepare Before Briefing a Rendering Studio
Preparation is the single biggest factor determining how quickly and accurately a studio can deliver. Builders who submit complete, well-organized briefs consistently receive faster turnarounds and fewer revision cycles.
Essential Documents Checklist
Use this checklist before submitting a rendering brief:
- All four exterior elevation drawings (minimum 1:100 scale, PDF or CAD format)
- Ground floor plan showing window and door positions
- Roof plan with material callouts
- Finishes schedule with manufacturer color codes
- Site plan with lot boundaries, driveway, and landscaping intent
- At least 3 reference/inspiration images for visual style
- Defined camera angles (or openness to studio recommendation)
- Delivery deadline and intended use (web, print, presentation)
- Any branding requirements (logo watermark, color profile, image dimensions)
Common Documentation Gaps That Slow Projects Down
Builders frequently submit incomplete packages without realizing the downstream impact. The most common gaps include:
- Missing material specifications: When finishes schedules are absent, the studio must pause and request clarification. This adds two to three business days of lag.
- Outdated drawings: Submitting preliminary design drawings that have since been revised leads to rework. Always confirm the drawings are the current issued-for-construction (IFC) set.
- No site context: Studios can generate a generic environment, but if your project sits in a specific neighbourhood with notable streetscape character, providing aerial imagery or site photos improves contextual accuracy significantly.
- Vague camera angle instructions: “Front view” is insufficiently specific. Provide a rough sketch or reference image showing the desired framing.
3D Exterior Rendering for Single-Family Homes: Key Pricing Factors
Pricing for 3D exterior rendering of single-family homes varies based on project complexity, deliverable scope, and turnaround requirements. For a granular breakdown of cost structures across project types, the 3D exterior rendering cost and price guide provides a complete framework including price ranges by deliverable type.
Pricing Comparison: Still Images vs. Animated Deliverables
| Deliverable | Typical Price Range | Turnaround (Standard) |
|---|---|---|
| Single exterior still render | $300 - $800 | 5-7 business days |
| 3-angle still render package | $700 - $1,800 | 7-10 business days |
| Dusk/twilight variant (add-on) | $150 - $350 per view | +2-3 business days |
| 360-degree panorama | $600 - $1,200 | 7-12 business days |
| 30-60 second animated walkthrough | $1,500 - $4,500 | 15-25 business days |
Note: Pricing reflects mid-market professional studio rates. Premium boutique studios with specialized residential portfolios will command higher rates. Rush delivery (48-72 hours) typically carries a 40-60% surcharge.
What Drives Cost Up
- High architectural complexity (custom rooflines, intricate cladding patterns, multiple material transitions)
- Detailed landscaping with mature trees, hardscaping, and pool areas
- Very tight deadlines requiring rush production
- Multiple facade variants (e.g., same plan with five different color schemes)
- Aerial or bird's-eye perspectives requiring full neighborhood context modeling
What Keeps Cost Down
- Clean, complete documentation submitted upfront
- Standardized or repeat-use house plans across a development
- Flexibility on turnaround (standard vs. rush)
- Bundling multiple homes or elevations in a single engagement
How 3D Exterior Rendering Differs Across Project Types
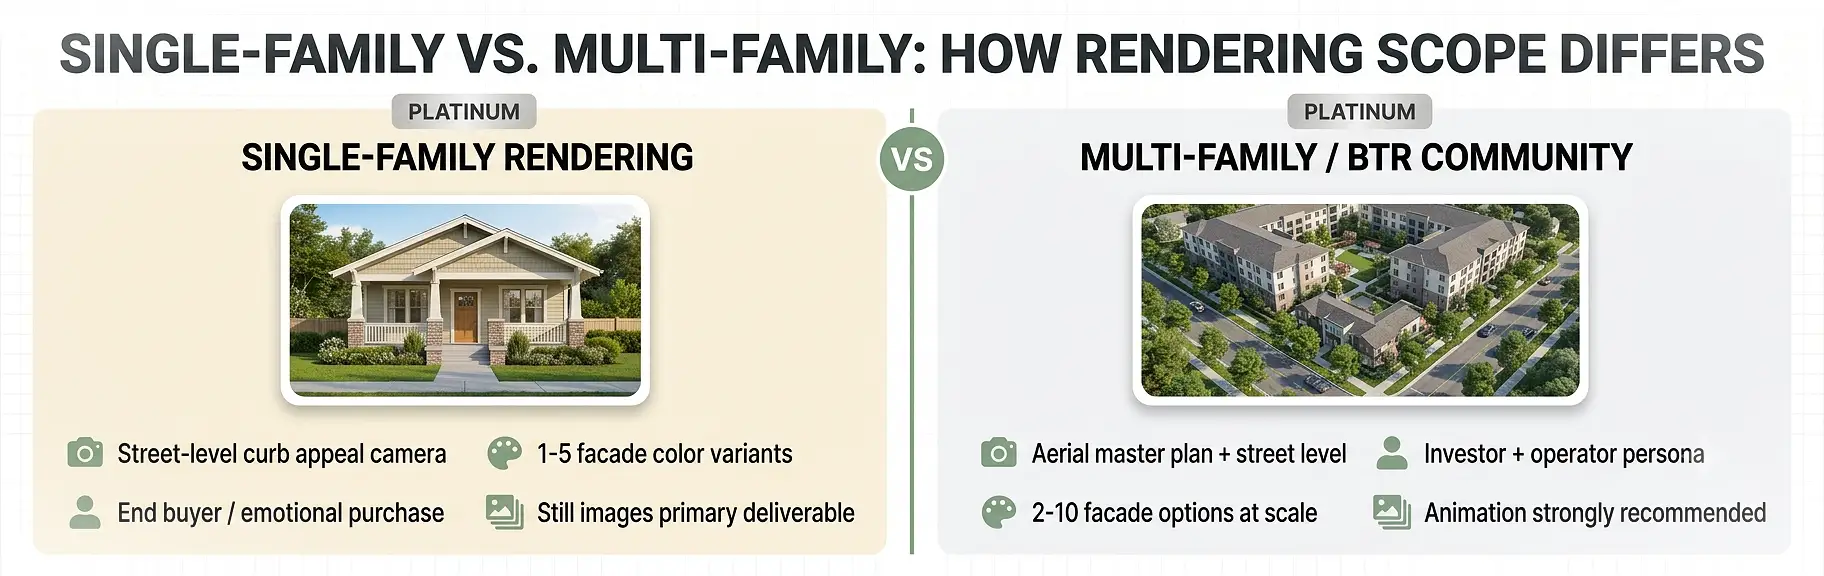
Single-family rendering has specific characteristics that distinguish it from larger-scale residential or commercial work. Understanding these differences helps builders brief studios with appropriate expectations.
Builders working on purpose-built rental communities or multi-unit residential portfolios will recognize that the rendering scope, camera strategy, and community context elements differ substantially from single-family work. The 3D exterior rendering approach for purpose-built rental communities covers those specific considerations in detail.
Single-Family vs. Multi-Family Rendering: Key Differences
| Factor | Single-Family | Multi-Family / BTR Community |
|---|---|---|
| Primary camera angle | Street-level, curb-appeal view | Aerial master plan + street-level |
| Landscape complexity | Front yard, backyard, driveway | Shared amenities, streetscapes, community zones |
| Deliverable priority | Individual home elevations | Community renders + individual unit options |
| Buyer persona | End purchaser (emotional) | Investor / operator (analytical + emotional) |
| Facade variation volume | 1-5 color schemes per plan | 2-10 facade options across 50-500 units |
| Animation need | Optional | Strongly recommended for community marketing |
Common Mistakes Single-Family Builders Make with 3D Rendering Projects
Even experienced builders with multiple rendering projects behind them fall into avoidable patterns. These are the mistakes that most consistently cause delays, cost overruns, and suboptimal final results.
Mistake 1: Engaging a Studio Too Late in the Design Phase
Many builders commission renders only after construction documents are finalized. This is a missed opportunity. Engaging a rendering studio at the schematic design stage allows renders to drive buyer interest and gather market feedback before the design is locked, potentially saving expensive last-minute plan revisions.
Mistake 2: Treating the Render as a Photograph
3D renders are interpretive visualizations, not photographic records of a finished building. Finishes in the real world will vary from screen-calibrated render output based on monitor settings, lighting conditions, and real-world material variation. Setting this expectation clearly with buyers prevents post-handover disputes.
Mistake 3: Approving Renders Without Checking Architectural Accuracy
Approving a render because it "looks good" without checking it against construction drawings is a significant risk. A wall that looks attractive in the render but is positioned incorrectly relative to the plan can create confusion during construction. Always assign your architect or project manager to validate technical accuracy before final approval.
Mistake 4: Over-Specifying the Landscape
Specifying mature canopy trees, lush full-coverage turf, and elaborate garden beds in renders for entry-level or spec homes can set buyer expectations that landscaping at handover will never match. Studios should be briefed to reflect realistic landscaping intent, not aspirational show-home styling.
Mistake 5: Ignoring the Dusk/Twilight Render Opportunity
Dusk renders, produced with warm interior lighting glowing through glazing and soft ambient exterior lighting, consistently outperform daytime renders in digital advertising click-through rates. Many builders skip this deliverable to save cost, but the incremental investment is typically modest and the marketing return is disproportionately high.
Expert Tips for Getting the Best Results from Your Rendering Partner
These are the practices that experienced residential builders and their project marketing teams use to extract maximum value from every rendering engagement.
Tip 1: Standardize Your Brief Template
Create a standardized brief document that your team completes for every rendering project. This brief should capture camera angle preferences, mandatory branding requirements, material specifications, delivery format, and deadline. Standardization reduces briefing back-and-forth by approximately 30-40%.
Tip 2: Build a Centralized Material Library
Maintain a digital library of your standard material finishes, including manufacturer color codes, product names, and reference photos. Share this with your studio partner at the start of every engagement. Studios that have your full materials library can apply finishes immediately without waiting for clarification.
Tip 3: Request a Test Frame Before Full Production
For new studio relationships, request a single test frame before approving full production. This low-cost checkpoint confirms that the studio's interpretation of your brief aligns with your expectations before significant modeling hours are invested.
Tip 4: Leverage Existing 3D Models Across Elevation Variants
If your studio builds a 3D model for one elevation variant of a plan, that model can be rapidly re-textured to produce additional facade option renders at a fraction of the original cost. A base model produced for your standard brick elevation can be adapted for a render of the Hamptons-style weatherboard variant for $150-$300 rather than $600-$800 from scratch.
Tip 5: Use Renders Across Your Full Marketing Funnel
A single high-quality render can be repurposed across multiple touchpoints: website gallery, MLS listing, social media, print brochure, email marketing, hoarding board, and construction site signage. Brief your studio to deliver files in the correct resolution for each intended use upfront, rather than returning later for re-exports.
Frequently Asked Questions About 3D Exterior Rendering for Single-Family Homes
What is 3D exterior rendering for single-family homes?
3D exterior rendering for single-family homes is the production of photorealistic, CGI-generated images of a residential property's exterior based on architectural drawings and material specifications. These renders are produced before or during construction and are used for pre-sales marketing, buyer presentations, permit submissions, and design validation. The outputs can include still images, 360-degree interactive panoramas, and animated walkthroughs.
How long does a 3D exterior rendering project take for a single-family home?
Standard turnaround for a single exterior still render of a single-family home is five to seven business days from the date of complete brief submission. A three-to-four-angle package typically takes seven to ten business days. Animated walkthroughs require fifteen to twenty-five business days. Rush delivery options (48-72 hours) are available from most professional studios at an additional surcharge of 40-60% above standard rates.
What files do I need to provide for a 3D exterior rendering of my home?
The minimum required assets are: all four exterior elevation drawings in PDF or CAD format, a floor plan, a roof plan, and a finishes schedule with manufacturer color codes. Additionally, providing a site plan, at least three reference images, and a brief covering camera angles and delivery intent will significantly accelerate production and improve accuracy.
How much does 3D exterior rendering cost for a single-family home?
A single professional-quality exterior still render for a single-family home typically ranges from $300 to $800. A multi-angle package covering three to four views ranges from $700 to $1,800. Animated walkthrough videos start at approximately $1,500 and can reach $4,500 for complex, fully landscaped productions. Pricing varies based on architectural complexity, turnaround speed, studio specialization, and deliverable format.
Can I get multiple facade option renders from the same 3D model?
Yes. Once a studio builds a base 3D model for your home plan, additional facade color scheme or cladding material variants can be produced by re-texturing the existing model. This is significantly more cost-effective than commissioning new renders from scratch and is a standard practice used by volume builders offering multiple elevation options per plan.
Are 3D renders accurate enough to use for building permits or planning approvals?
3D exterior renders are widely accepted as supporting visual documentation for planning and design review submissions, particularly for HOA approvals, design panel reviews, and development application packages. However, they are not substitutes for stamped construction drawings; they complement the technical documentation set rather than replace it. Accuracy depends directly on the quality and completeness of the architectural drawings submitted to the studio.
What is the difference between a daytime and a dusk 3D exterior render?
A daytime render uses simulated midday or afternoon natural sunlight to illuminate the home's exterior, emphasizing material texture, color accuracy, and architectural detail. A dusk or twilight render is set at the blue hour - after sunset, with warm interior lighting glowing through glazing and soft exterior landscape lighting active. Dusk renders tend to generate stronger emotional engagement in digital marketing contexts and typically outperform daytime renders in social media and digital advertising click-through rates.
How does 3D exterior rendering for single-family homes differ from rendering for larger developments?
Single-family home rendering focuses on individual curb appeal, facade materiality, and buyer-level emotional engagement. Deliverables emphasize street-level camera angles and personalization options. Larger multi-family or purpose-built rental community projects require additional aerial context, community amenity rendering, and master plan visualization. The technical production process is similar, but the deliverable set, camera strategy, and marketing application differ substantially.
Turning Blueprints into Buyer-Ready Visuals
3D exterior rendering for single-family homes has moved from a luxury reserved for prestige custom builders to a standard production tool for any builder serious about pre-sales performance and buyer experience. The process is well-established, the deliverable quality is consistently high, and the return on investment - measured in reduced sales timelines, stronger buyer confidence, and fewer mid-build revision requests - is demonstrable across market segments.
The builders who extract the most value from rendering are not the ones with the largest budgets; they are the ones who engage a studio early, submit complete documentation, and use their renders strategically across every touchpoint in the marketing and approvals workflow.
Preparation is the highest-leverage action you can take. Know what drawings, specifications, and briefs your studio needs. Understand the workflow stages and where your input is required. Plan your renders into the project schedule, not as an afterthought once construction documents are complete.
If you are ready to put photorealistic exterior visuals to work for your next single-family home project, partner with The 3D Exterior Rendering Company to accelerate your pre-sales and buyer conversion outcomes - a team with 10-plus years of dedicated residential rendering expertise and a proven production process built for builders.