Understanding the 3D exterior rendering workflow is the single most powerful step any architect, developer, or real estate marketer can take before commissioning a project. This step-by-step process transforms a set of flat drawings into a photorealistic image that sells ideas, secures approvals, and closes deals – often before a single brick is laid.
Whether you are hiring a studio for the first time or looking to streamline your existing pipeline, this guide covers every phase in detail: from the very first client brief all the way through to final file delivery. By the end, you will know exactly what happens behind the scenes, what to provide, and how to get the highest-quality results as efficiently as possible.
For a quick overview of our studio’s capabilities before diving in, visit the The 3D Exterior Rendering Company
What is the 3D Exterior Rendering Workflow? (Quick Answer)
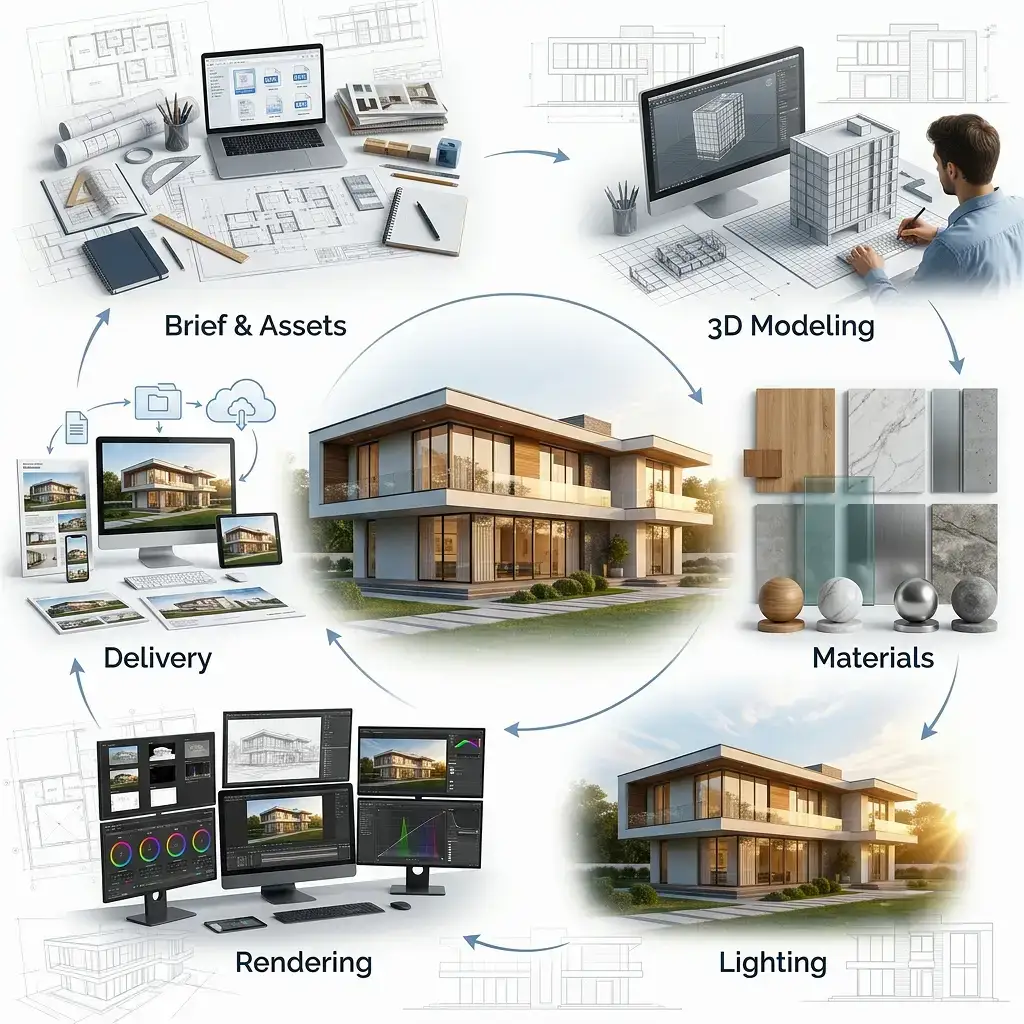
The 3D exterior rendering workflow is a structured production pipeline that converts architectural drawings, BIM models, and design briefs into photorealistic exterior visualizations. The workflow typically covers six core stages: project briefing and asset collection, 3D modeling and scene assembly, material and texture application, lighting setup, rendering and compositing, and final delivery.
Each stage depends on the quality of the previous one. A poorly prepared model creates lighting errors; a weak lighting setup wastes hours of render computation; imprecise compositing undermines even the most detailed geometry. This guide unpacks every stage so you get the full picture.
Stage 1: Project Brief and Asset Collection
Every high-quality exterior render begins long before an artist opens their 3D software. The first stage is all about information – collecting the right assets and aligning on creative direction.
What the Studio Needs from You
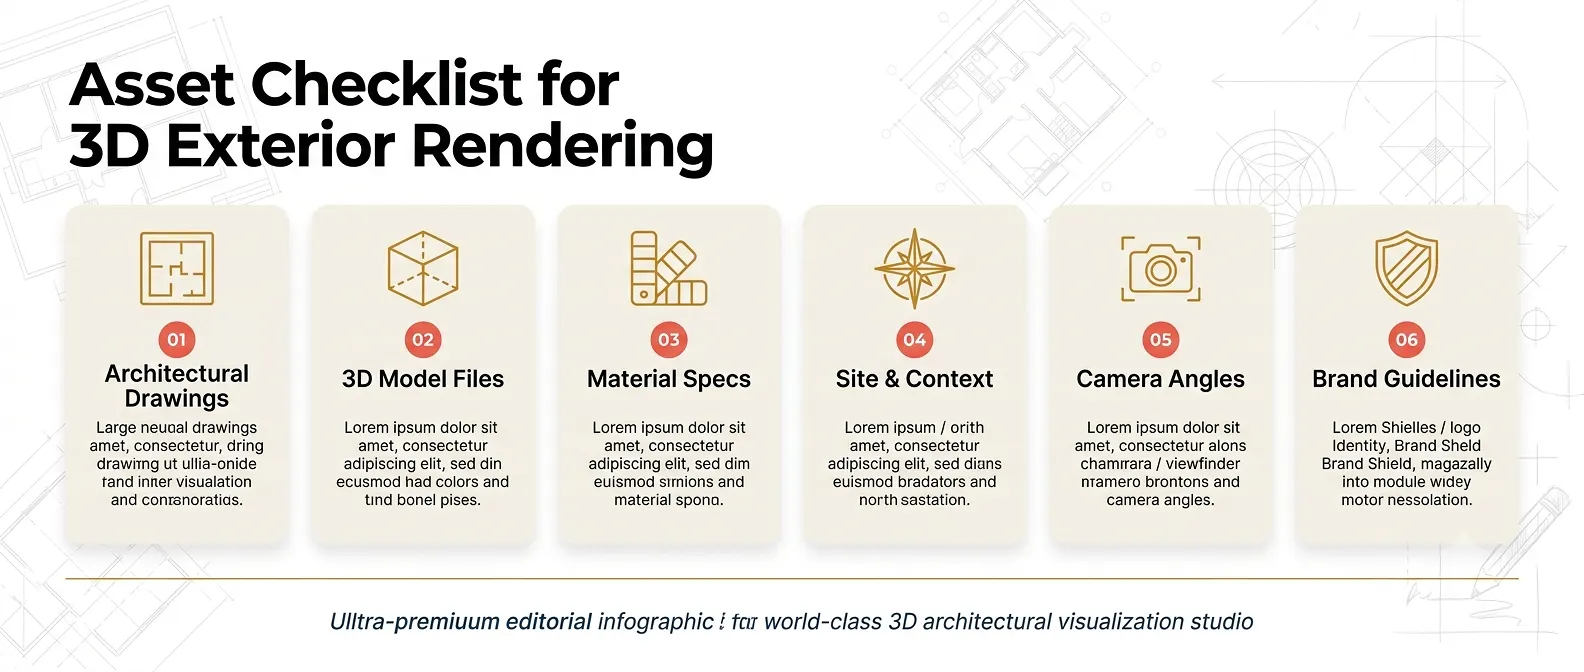
Providing complete, well-organized files at this stage directly reduces revision cycles and turnaround time. At a minimum, a professional studio will request:
- Architectural drawings: Floor plans, elevations, and site plans in .DWG, .PDF (vector), or .RVT format.
- 3D model files (if available): .FBX, .OBJ, .3DS, or native Revit/SketchUp/Rhino files. Always purge hidden layers and redundant geometry before exporting.
- Material and finish specifications: Physical sample photos, manufacturer product links, RAL/Pantone color codes, or a curated mood board.
- Site and context information: A north arrow on plans, GPS coordinates or a Google Maps link, and neighboring structures for accurate shadow casting.
- Camera preference: Annotated 2D plot plan showing preferred viewing angles, eye levels, and the marketing story you want each shot to tell.
- Brand and marketing guidelines: Logo files, approved color palettes, and any typography required for watermarks or overlays.
The Discovery Call: Aligning on Vision
Beyond raw files, most studios schedule a discovery call to align on mood, lighting time-of-day, seasonal context, and level of photorealism. These conversations prevent costly misunderstandings. Bring reference images – lifestyle photos, competitor renders, or architectural photography – to anchor the discussion with concrete visual targets.
Stage 2: 3D Modeling and Scene Assembly
With assets in hand, the modeling phase begins. This is where the project transitions from paper to pixels – and where precision matters most.
Building or Cleaning the Base Model
If a client submits a native BIM or CAD file, the first task is geometry optimization. Working drafts often contain millions of hidden polygons: interior walls, plumbing routes, overlapping surfaces, and structural elements the camera will never see. Importing these directly into a render engine like V-Ray or Unreal Engine 5 forces the software to calculate light interactions for geometry that simply does not need to exist.
Real-world example: On a recent commercial plaza project, a submitted Revit model contained 14 million polygons. Applying a structured geometry decimation protocol – collapsing interior objects and merging coplanar surfaces – reduced the poly-count to 4.2 million without sacrificing any exterior detail. The result: active render computation dropped from 18 hours per frame to just 4 hours, delivering the first draft a full weekend ahead of schedule.
Modeling from 2D Drawings
When no 3D file is available, the studio’s artists construct the model entirely from 2D plans and elevations. This process involves:
- Importing .DWG plans as a 1:1 scale reference layer inside 3ds Max, Blender, or Cinema 4D.
- Extruding walls, floors, rooflines, and structural elements from the reference lines.
- Adding architectural details: window mullions, coping stones, balustrades, cladding panels, and facade articulation.
- Integrating high-quality entourage: trees, parked vehicles, street furniture, and human-scale figures to establish context and scale.
- Reviewing the geometry against the original elevations before proceeding to materials.
Site and Context Modeling
Exterior renders do not exist in isolation. A convincing image requires a plausible surrounding environment: terrain, roads, neighboring buildings, and sky. Studios typically model a context zone extending 50-100 meters beyond the subject building – enough to establish setting without unnecessary computation overhead.
Stage 3: Material and Texture Application
Photorealism lives or dies in the material pass. Even the most accurate geometry looks flat and unconvincing without physically accurate surface descriptions.
PBR Materials: The Industry Standard
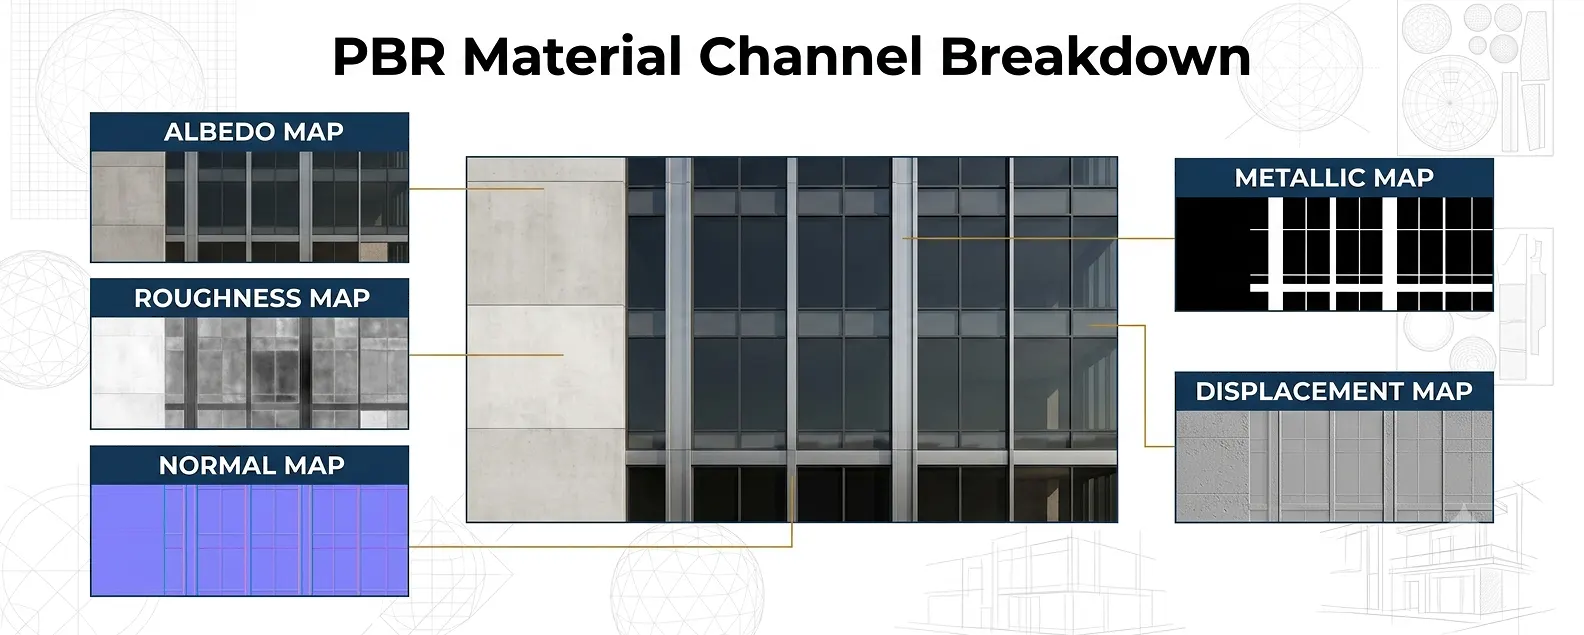
Modern rendering pipelines rely on Physically Based Rendering (PBR) materials. Each material is defined by a set of maps that describe how light interacts with the surface:
- Albedo/Diffuse map: Base color of the surface under neutral white light.
- Roughness map: Controls how mirror-like or matte the surface appears.
- Normal map: Simulates fine surface texture detail (brick mortar joints, concrete aggregate) without adding geometry.
- Metallic map: Defines which areas of the surface behave as conductive metals – critical for curtain wall glazing and aluminum cladding.
- Displacement map: Physically displaces geometry for macro surface relief, such as rough stone or weathered timber.
Sourcing and Matching Real-World Materials
Studios use dedicated material libraries from providers such as Poliigon, Quixel Megascans, and Chaos Cosmos to build physically accurate surfaces. However, when a client specifies a manufacturer product – say, a Kingspan insulated panel in a specific RAL color – the artist must custom-build that material using manufacturer technical data sheets and physical samples.
Providing accurate material references at the briefing stage cuts down color correction rounds by up to 40% and eliminates the most common source of client revision requests.
Stage 4: Lighting Setup and Camera Composition
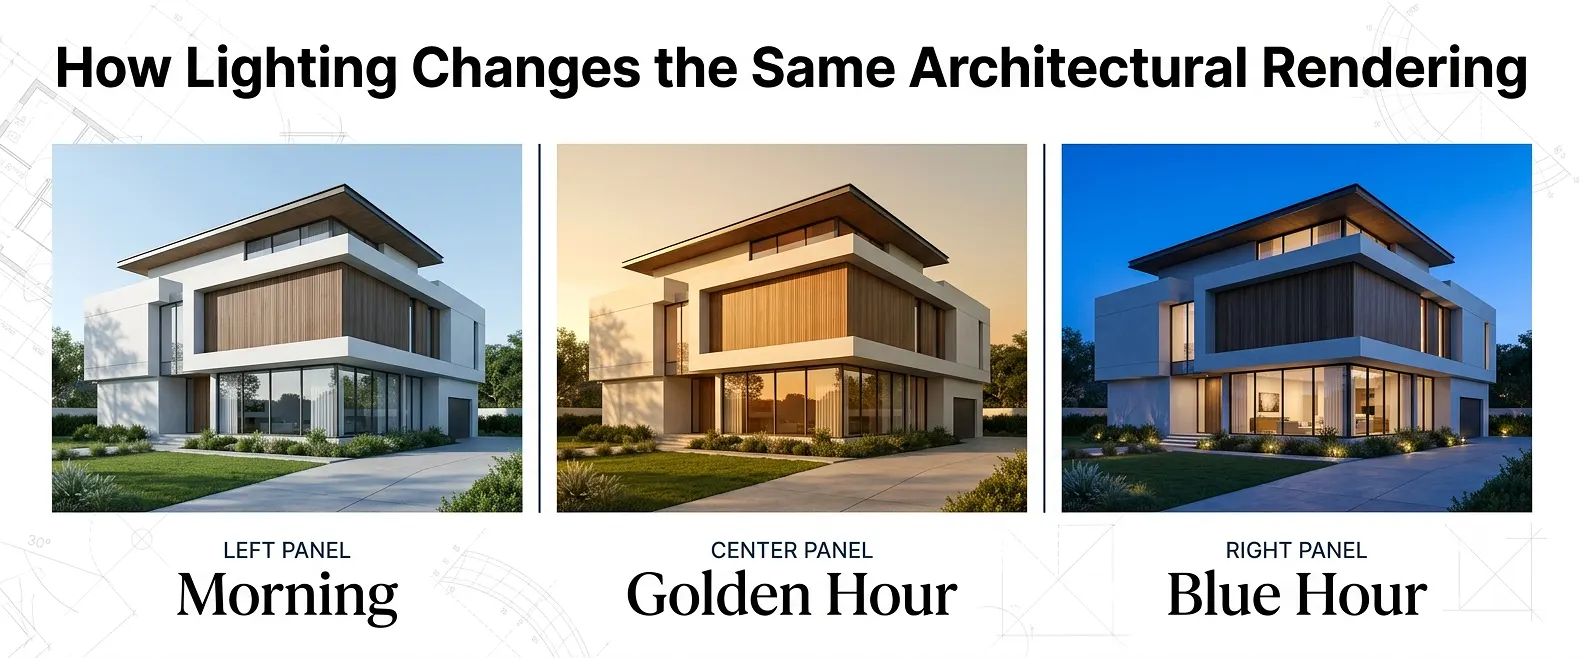
Lighting is arguably the most creative and technically demanding stage of the entire 3D exterior rendering workflow. Correct lighting does three things simultaneously: it establishes the time of day and atmosphere, it reveals form and material quality, and it drives the emotional response from the viewer.
HDRI Environment Lighting
The most efficient exterior lighting approach uses High Dynamic Range Image (HDRI) environment maps. A single spherical HDRI captures the full luminance range of a real sky – including the sun, overcast diffusion, reflections, and ambient occlusion – and wraps it around the entire scene. Studios typically work with premium HDRI libraries from sources like HDRI Haven (now Poly Haven) for natural accuracy.
Sun, Shadow, and Time-of-Day Studies
For accurate shadow direction, the render engine’s sun system is configured using the project’s GPS coordinates, the project’s geographic latitude/longitude, and a specific date and time. This is particularly important for:
- Planning applications and environmental impact assessments requiring accurate solar studies.
- Marketing renders targeting a golden hour or blue hour mood.
- Visualizing overshadowing impact on neighboring properties.
Camera Framing and Focal Length
Camera setup in 3D works identically to real photography. The virtual camera’s focal length, sensor size, aperture, and exposure settings interact with the lighting to produce the final image character. Common approaches include:
- Wide angle (20-28mm equivalent): Emphasizes building scale and street-level drama. Ideal for residential street views and commercial landmark shots.
- Standard (35-50mm equivalent): Balances perspective distortion with natural proportions. Preferred for planning submissions.
- Elevated drone perspective: Communicates site relationship, massing, and landscaping. Essential for large masterplan developments.
Stage 5: Rendering, Post-Production, and Compositing
With geometry, materials, and lighting finalized, the scene is passed to the render engine. This compute-intensive phase converts the 3D data into a 2D image through the simulation of light physics.
Choosing the Right Render Engine
The choice of render engine directly impacts quality, speed, and creative flexibility. The table below compares the three engines most commonly used in professional exterior visualization workflows:
| RENDER ENGINE |
STRENGTHS | BEST USE CASE | TYPICAL FRAME TIME* |
|---|---|---|---|
| V-Ray (Chaos) | Industry-leading photorealism; deep material library | Premium residential and commercial stills | 2–8 hrs (1 node) |
| Unreal Engine 5 | Real-time output; Lumen GI; flythrough-ready | Interactive tours, large masterplans | Real-time / min per frame |
| Lumion | Fast scene assembly; accessible library | Concept-stage and planning renders | 10–45 min |
*Approximate single-node render times at 4K resolution. Farm rendering significantly reduces delivery times.
Multi-Pass Rendering and Compositing
Professional studios rarely output a single raw image file. Instead, they render separate passes – beauty, shadow, reflection, ambient occlusion, depth of field – and composite them together in post-production software such as Adobe Photoshop or DaVinci Resolve. This approach offers:
- Non-destructive editing: individual passes can be adjusted without re-rendering the full scene.
- Sky replacement: the sky plate is a separate layer, allowing mood changes in post without additional render time.
- Entourage compositing: foreground vegetation, people, and vehicles can be added as 2D cutouts, dramatically accelerating production.
- Color grading: overall tone, contrast, and warmth are finalized in the compositing stage to match brand guidelines.
Resolution and Output Specifications
Output resolution depends on the intended end use. The table below provides a practical reference for common project types:
| USE CASE | RECOMMENDED RESOLUTION | ASPECT RATIO | FILE FORMAT |
|---|---|---|---|
| Website / Social Media | 1920 x 1080 px (FHD) | 16:9 | JPG (80-90% quality) |
| Print Brochure / Hoarding | 5000 x 3333 px+ | 3:2 | TIFF / PSD |
| Planning Application | 3508 x 2480 px (A4 @ 300dpi) | ISO A4 | PDF / TIFF |
| Exhibition Display | 7680 x 4320 px (8K) | 16:9 | TIFF / PNG |
| Social / Story Format | 1080 x 1920 px | 9:16 | JPG / PNG |

Stage 6: Review, Revisions, and Final Delivery
Quality assurance is not the final stage – it is woven throughout the entire workflow. However, the formal review and revision loop happens here, between the studio and the client.
The Revision Process
A structured revision process protects both the client’s creative vision and the studio’s production timeline. Standard professional practice includes:
- Initial draft delivery in a lower-resolution proof format, typically 50% of final resolution, for fast download and review.
- Client feedback submission via an annotated PDF, shared document, or structured feedback form – avoiding ambiguous verbal descriptions.
- Revision implementation and re-proof delivery, typically within 24-48 hours for minor changes.
- Final approval sign-off before high-resolution rendering begins.
- Full-resolution file delivery in agreed formats, alongside raw PSD/compositing files if specified.
File Delivery and Asset Archiving
At delivery, the client typically receives a structured file package containing the final high-resolution TIFF or JPG, web-optimized versions at multiple resolutions, layered PSD composites (if agreed), and a project archive of the 3D scene files for future updates. Reputable studios retain scene files for a defined period – usually 12-24 months – allowing updates to be applied without rebuilding from scratch.
Core Software Used in a Professional 3D Exterior Rendering Workflow
Understanding the tools behind the process helps you ask better questions and evaluate studio capability. Here is a stage-by-stage software reference:
| WORKFLOW STAGE | PRIMARY SOFTWARE | KEY FUNCTION |
|---|---|---|
| Modeling | 3ds Max, Blender, SketchUp, Rhino, Revit | Building and cleaning the 3D geometry |
| Materials | Substance Painter, Quixel Mixer, V-Ray Material Editor | Authoring and applying PBR materials |
| Rendering | V-Ray, Corona Renderer, Unreal Engine 5, Lumion | Calculating light and outputting image passes |
| Post-Production | Adobe Photoshop, DaVinci Resolve, Lightroom | Compositing, color grading, and retouching |
| Project Management | Notion, Asana, Frame.io, Monday.com | Brief tracking, file sharing, and approvals |
5 Common Mistakes That Slow Down the 3D Exterior Rendering Workflow
Experienced studios see the same client-side mistakes repeatedly. Avoiding these five issues will save significant time and budget on your next project:
Mistake 1: Submitting Unoptimized CAD or BIM Files
Providing a working-draft model packed with hidden geometry and duplicate layers is the single most common cause of project delays. Always export a clean file: purge unused blocks, remove interior elements that fall outside the camera view, and verify scale and units before sending.
Mistake 2: Vague Material Specifications
Describing a finish as ‘a nice warm grey stone’ leaves enormous interpretation room. Provide physical sample photos, manufacturer product names, or RAL/Pantone references. The more precise the brief, the fewer correction rounds.
Mistake 3: Changing the Brief After Modeling Starts
Introducing significant design changes – a revised facade system, a relocated entrance, or an additional floor – after the modeling phase is underway typically triggers a scope revision and timeline extension. Freeze the design before the production clock starts.
Mistake 4: Requesting a Single Camera Angle
A single hero shot rarely tells the full story of a building. Commission a minimum of two to three complementary views: a street-level elevation, an elevated drone perspective, and a lifestyle detail shot. This gives your marketing team flexible content for multiple formats.
Mistake 5: Ignoring Resolution Requirements
Ordering a web-resolution render and later needing it for a 6-metre exhibition hoarding requires a full re-render at significant additional cost. Confirm all end-use specifications – print, digital, exhibition – before production begins.
Expert Tips to Get the Best Results from Your Render Studio
These recommendations come directly from production experience across hundreds of exterior visualization projects:
- Share real-world reference images, not just words. A Pinterest board or a folder of architectural photography references calibrates the studio’s creative direction faster than any written brief.
- Request a wireframe or clay render before the full beauty pass. Reviewing geometry in a neutral grey material catches modeling errors before expensive lighting and material work has been invested.
- Agree on a color-managed workflow. Confirm that the studio delivers files in a consistent color space (typically sRGB for web, AdobeRGB for print) so renders display correctly across devices.
- Budget for at least two to three camera angles from the start. Commissioning additional shots later in the project always costs more than including them in the original brief.
- Use the 3D scene as a living asset. A well-built render scene can be updated to reflect design changes, seasonal variations, or new marketing needs – making it a long-term business asset rather than a one-time expense.

Frequently Asked Questions About the 3D Exterior Rendering Workflow
How long does the 3D exterior rendering workflow typically take?
A standard single exterior still render takes between 5 and 10 business days from complete asset receipt to final delivery. Complex multi-building masterplans or animation projects extend to 3-6 weeks. Turnaround time depends heavily on file quality at submission: optimized, complete files at Stage 1 consistently deliver the fastest results.
What file formats should I submit to start the 3D exterior rendering workflow?
The preferred formats are .RVT (Autodesk Revit), .DWG (AutoCAD), .FBX, .OBJ, and .3DS for 3D geometry. For 2D reference drawings, provide vector .PDF or .DWG files. For material references, high-resolution .JPG or .TIFF images work best. Always confirm preferred formats with your studio before exporting.
What is the difference between V-Ray and Unreal Engine 5 in the rendering workflow?
V-Ray is a bias/unbiased CPU and GPU ray-tracing engine optimized for photorealistic still images and animations where render quality is the primary concern. Unreal Engine 5 uses real-time rasterization combined with hardware ray tracing (Lumen) and is best suited to interactive walkthroughs, real-time VR experiences, and large masterplan animations where speed is prioritized. Most high-end residential and commercial still projects use V-Ray or Corona Renderer.
Can the 3D exterior rendering workflow be used for planning applications?
Yes. Photorealistic exterior renders produced through a rigorous 3D exterior rendering workflow are widely accepted by planning authorities as supporting documentation for design and access statements, heritage impact assessments, and environmental impact reports. The key requirement is accuracy: renders must faithfully represent the proposed design, materials, and context without enhancement or misrepresentation.
How much does a 3D exterior rendering workflow project cost?
Pricing varies significantly based on complexity, number of views, resolution, and turnaround requirements. Simple residential stills typically start from a few hundred dollars, while complex commercial masterplan packages run into the thousands. For an accurate project estimate, visit our homepage and submit a brief through our enquiry form.
What is photomontage and how does it fit into the rendering workflow?
A photomontage composites a 3D rendered building into a photograph of the real site. The 3D rendering workflow handles the building model, materials, and lighting, while post-production aligns the render’s perspective, lighting, and color to match the base photograph. Photomontage is commonly required for planning submissions in sensitive heritage or urban contexts.
Master the 3D Exterior Rendering Workflow for Better Outcomes
A well-executed 3D exterior rendering workflow is not a luxury reserved for landmark projects. It is a practical business process that reduces design risk, accelerates stakeholder approval, and produces marketing assets that directly drive sales. Every stage – from brief to delivery – is interconnected, and understanding the full pipeline gives you the confidence to brief studios effectively, review work intelligently, and make decisions that maximize your return on investment.
The studios that deliver the best exterior renders are those that treat each project as a collaborative production, not a transactional file-in, image-out exercise. They invest time in understanding your vision at the brief stage, maintain clear communication at every milestone, and deliver structured file packages designed for long-term reuse.
If you are ready to start a project or want to explore what is possible for your specific brief, visit The 3D Exterior Rendering Company to get in touch with our team today.